Drone CI 搭建

最近感觉 GitLab CI 稍有繁琐,所以尝试了一下 Drone CI,这里记录一下搭建过程;虽然 Drone CI 看似简单,但是坑还是有不少的

一、环境准备

基本环境如下:

  • Docker: 17.09.0-ce
  • GitLab: 10.4.3-ce.0
  • Drone: 0.8.5

其中 GitLab 采用 TLS 链接,为了方便使用 git 协议 clone 代码,所以 docker compose 部署时采用了 macvlan 网络获取独立 IP

二、GitLab 配置

2.1、GitLab 搭建

为了测试 CI build 需要一个 GitLab 服务器以及测试项目,GitLab 这里直接采用 docker compose 启动,同时为了方便 git clone,网络使用了 macvlan 方式,macvlan 网络接口、IP 等参数请自行修改

1
2
3
4
5
6
7
8
9
10
11
12
13
14
15
16
17
18
19
20
21
22
23
24
25
26
27
28
29
30
31
32
33
34
35
36
37
38
39
40
41
42
43
44
45
46
47
48
49
50
51
52
53
54
55
56
57
58
59
60
61
62
63
64
65
66
67
68
69
70
71
72
73
74
75
76
77
78
79
80
81
82
83
84
85
86
87
88
89
90
91
92
93
94
95
96
97
98
99
100
101
102
103
104
105
106
107
108
109
110
111
112
113
114
115
116
# config refs ==> https://gitlab.com/gitlab-org/omnibus-gitlab/blob/master/files/gitlab-config-template/gitlab.rb.template
version: '3'
services:
gitlab:
image: 'gitlab/gitlab-ce:10.4.3-ce.0'
container_name: gitlab
restart: always
hostname: 'gitlab.mritd.me'
environment:
GITLAB_OMNIBUS_CONFIG: |
external_url 'https://gitlab.mritd.me'
nginx['redirect_http_to_https'] = true
nginx['ssl_certificate'] = "/etc/gitlab/ssl/mritd.me.cer"
nginx['ssl_certificate_key'] = "/etc/gitlab/ssl/mritd.me.key"
nginx['real_ip_header'] = 'X-Real-IP'
nginx['real_ip_recursive'] = 'on'
#gitlab_rails['ldap_enabled'] = true
#gitlab_rails['ldap_servers'] = YAML.load <<-EOS # remember to close this block with 'EOS' below
#main: # 'main' is the GitLab 'provider ID' of this LDAP server
# ## label
# #
# # A human-friendly name for your LDAP server. It is OK to change the label later,
# # for instance if you find out it is too large to fit on the web page.
# #
# # Example: 'Paris' or 'Acme, Ltd.'
# label: 'LDAP'
# host: 'mail.mritd.me'
# port: 389 # or 636
# uid: 'uid'
# method: 'plain' # "tls" or "ssl" or "plain"
# bind_dn: 'uid=zimbra,cn=admins,cn=zimbra'
# password: 'PASSWORD'
# # This setting specifies if LDAP server is Active Directory LDAP server.
# # For non AD servers it skips the AD specific queries.
# # If your LDAP server is not AD, set this to false.
# active_directory: true
# # If allow_username_or_email_login is enabled, GitLab will ignore everything
# # after the first '@' in the LDAP username submitted by the user on login.
# #
# # Example:
# # - the user enters 'jane.doe@example.com' and 'p@ssw0rd' as LDAP credentials;
# # - GitLab queries the LDAP server with 'jane.doe' and 'p@ssw0rd'.
# #
# # If you are using "uid: 'userPrincipalName'" on ActiveDirectory you need to
# # disable this setting, because the userPrincipalName contains an '@'.
# allow_username_or_email_login: true
# # Base where we can search for users
# #
# # Ex. ou=People,dc=gitlab,dc=example
# #
# base: ''
# # Filter LDAP users
# #
# # Format: RFC 4515 http://tools.ietf.org/search/rfc4515
# # Ex. (employeeType=developer)
# #
# # Note: GitLab does not support omniauth-ldap's custom filter syntax.
# #
# user_filter: ''
#EOS
gitlab_rails['log_directory'] = "/var/log/gitlab/gitlab-rails"
unicorn['log_directory'] = "/var/log/gitlab/unicorn"
registry['log_directory'] = "/var/log/gitlab/registry"
# Below are some of the default settings
logging['logrotate_frequency'] = "daily" # rotate logs daily
logging['logrotate_size'] = nil # do not rotate by size by default
logging['logrotate_rotate'] = 30 # keep 30 rotated logs
logging['logrotate_compress'] = "compress" # see 'man logrotate'
logging['logrotate_method'] = "copytruncate" # see 'man logrotate'
logging['logrotate_postrotate'] = nil # no postrotate command by default
logging['logrotate_dateformat'] = nil # use date extensions for rotated files rather than numbers e.g. a value of "-%Y-%m-%d" would give rotated files like p
# You can add overrides per service
nginx['logrotate_frequency'] = nil
nginx['logrotate_size'] = "200M"
# You can also disable the built-in logrotate service if you want
logrotate['enable'] = false
gitlab_rails['smtp_enable'] = true
gitlab_rails['smtp_address'] = "mail.mritd.me"
gitlab_rails['smtp_port'] = 25
gitlab_rails['smtp_user_name'] = "no-reply@mritd.me"
gitlab_rails['smtp_password'] = "PASSWORD"
gitlab_rails['smtp_domain'] = "mritd.me"
gitlab_rails['smtp_authentication'] = "login"
gitlab_rails['smtp_enable_starttls_auto'] = true
gitlab_rails['smtp_openssl_verify_mode'] = 'peer'
# If your SMTP server does not like the default 'From: gitlab@localhost' you
# can change the 'From' with this setting.
gitlab_rails['gitlab_email_from'] = 'gitlab@mritd.me'
gitlab_rails['gitlab_email_reply_to'] = 'no-reply@mritd.me'
gitlab_rails['initial_root_password'] = 'PASSWORD'
gitlab_rails['initial_shared_runners_registration_token'] = "iuLaUhGZYyFgTxAyZ6HbdFUZ"
networks:
macvlan:
ipv4_address: 172.16.0.70
ports:
- '80:80'
- '443:443'
- '22:22'
volumes:
- config:/etc/gitlab
- logs:/var/log/gitlab
- data:/var/opt/gitlab

networks:
macvlan:
driver: macvlan
driver_opts:
parent: ens18
ipam:
config:
- subnet: 172.16.0.0/19

volumes:
config:
logs:
data:

2.2、创建 Drone App

Drone CI 工作时需要接入 GitLab 以完成项目同步等功能,所以在搭建好 GitLab 后需要为其创建 Application,创建方式如下所示

create drone app

创建 Application 时请自行更换回调地址域名,创建好后如下所示(后续 Drone CI 需要使用这两个 key)

drone app create success

三、Drone 服务端配置

3.1、Drone CI 搭建

Drone CI 服务器与 GitLab 等传统 CI 相似,都是 CS 模式,为了方便测试这里将 Agent 与 Server 端都放在一个 docker compose 中启动;docker compose 配置如下

1
2
3
4
5
6
7
8
9
10
11
12
13
14
15
16
17
18
19
20
21
22
23
24
25
26
27
28
29
30
31
32
33
34
35
36
37
version: '3'

services:
drone-server:
image: drone/drone:0.8-alpine
container_name: drone-server

ports:
- 8000:8000
- 9000:9000
volumes:
- data:/var/lib/drone/
restart: always
environment:
- DRONE_OPEN=true
- DRONE_ADMIN=drone,mritd
- DRONE_HOST=https://drone.mritd.me
- DRONE_GITLAB=true
- DRONE_GITLAB_PRIVATE_MODE=true
- DRONE_GITLAB_URL=https://gitlab.mritd.me
- DRONE_GITLAB_CLIENT=76155ab75bafd73d4ebfe0a02d9d6284a032f7d8667d558e3f929a64805d1fa1
- DRONE_GITLAB_SECRET=6957b06f53b80d4dd17051ceb36f9139ae83b9077e345a404f476e317b0c8f3d
- DRONE_SECRET=XsJnj4DmzuXBKkcgHeUAJQxq

drone-agent:
image: drone/agent:0.8
container_name: drone-agent
command: agent
restart: always
volumes:
- /var/run/docker.sock:/var/run/docker.sock
environment:
- DRONE_SERVER=172.16.0.36:9000
- DRONE_SECRET=XsJnj4DmzuXBKkcgHeUAJQxq

volumes:
data:

docker compose 中 DRONE_GITLAB_CLIENT 为 GitLab 创建 Application 时的 Application IdDRONE_GITLAB_SECRETSecret;其他环境变量解释如下:

  • DRONE_OPEN: 是否允许开放注册
  • DRONE_ADMIN: 注册后的管理员用户
  • DRONE_HOST: Server 地址
  • DRONE_GITLAB: 声明 Drone CI 对接为 GitLab
  • DRONE_GITLAB_PRIVATE_MODE: GitLab 私有化部署
  • DRONE_GITLAB_URL: GitLab 地址
  • DRONE_SECRET: Server 端认证秘钥,Agent 连接时需要

实际上 Agent 可以与 Server 分离部署,不过需要注意 Server 端 9000 端口走的是 grpc 协议基于 HTTP2,nginx 等反向代理时需要做好对应处理

搭建成功这里外面套了一层 nginx 用来反向代理 Drone Server 的 8000 端口,Nginx 配置如下:

1
2
3
4
5
6
7
8
9
10
11
12
13
14
15
16
17
18
19
20
21
22
23
24
25
26
27
28
29
30
31
32
33
34
35
36
37
38
39
40
41
42
43
44
45
46
47
48
49
50
51
52
53
54
55
56
57
58
59
60
61
62
63
64
65
upstream drone{
server 172.16.0.36:8000;
}
server {
listen 80;
listen [::]:80;
server_name drone.mritd.me;

# Redirect all HTTP requests to HTTPS with a 301 Moved Permanently response.
return 301 https://$host$request_uri;
}

server {
listen 443 ssl http2;
listen [::]:443 ssl http2;
server_name drone.mritd.me;

# certs sent to the client in SERVER HELLO are concatenated in ssl_certificate
ssl_certificate /etc/nginx/ssl/mritd.me.cer;
ssl_certificate_key /etc/nginx/ssl/mritd.me.key;
ssl_session_timeout 1d;
ssl_session_cache shared:SSL:50m;
ssl_session_tickets off;

# Diffie-Hellman parameter for DHE ciphersuites, recommended 2048 bits
ssl_dhparam /etc/nginx/ssl/dhparam.pem;

# intermediate configuration. tweak to your needs.
ssl_protocols TLSv1 TLSv1.1 TLSv1.2;
ssl_ciphers 'ECDHE-ECDSA-CHACHA20-POLY1305:ECDHE-RSA-CHACHA20-POLY1305:ECDHE-ECDSA-AES128-GCM-SHA256:ECDHE-RSA-AES128-GCM-SHA256:ECDHE-ECDSA-AES256-GCM-SHA384:EC
DHE-RSA-AES256-GCM-SHA384:DHE-RSA-AES128-GCM-SHA256:DHE-RSA-AES256-GCM-SHA384:ECDHE-ECDSA-AES128-SHA256:ECDHE-RSA-AES128-SHA256:ECDHE-ECDSA-AES128-SHA:ECDHE-RSA-AES2
56-SHA384:ECDHE-RSA-AES128-SHA:ECDHE-ECDSA-AES256-SHA384:ECDHE-ECDSA-AES256-SHA:ECDHE-RSA-AES256-SHA:DHE-RSA-AES128-SHA256:DHE-RSA-AES128-SHA:DHE-RSA-AES256-SHA256:D
HE-RSA-AES256-SHA:ECDHE-ECDSA-DES-CBC3-SHA:ECDHE-RSA-DES-CBC3-SHA:EDH-RSA-DES-CBC3-SHA:AES128-GCM-SHA256:AES256-GCM-SHA384:AES128-SHA256:AES256-SHA256:AES128-SHA:AES
256-SHA:DES-CBC3-SHA:!DSS';
ssl_prefer_server_ciphers on;

# HSTS (ngx_http_headers_module is required) (15768000 seconds = 6 months)
add_header Strict-Transport-Security max-age=15768000;

# OCSP Stapling ---
# fetch OCSP records from URL in ssl_certificate and cache them
ssl_stapling on;
ssl_stapling_verify on;

## verify chain of trust of OCSP response using Root CA and Intermediate certs
ssl_trusted_certificate /etc/nginx/ssl/mritd-ca.cer;

#resolver <IP DNS resolver>;

location / {

log_not_found on;

proxy_set_header X-Forwarded-For $remote_addr;
proxy_set_header X-Forwarded-Proto $scheme;
proxy_set_header Host $http_host;

proxy_pass http://drone;
proxy_redirect off;
proxy_http_version 1.1;
proxy_buffering off;

chunked_transfer_encoding off;
}
}

然后访问 https://YOUR_DRONE_SERVER 将会自动跳转到 GitLab Auth2 授权界面,授权登录即可;随后将会返回 Drone CI 界面,界面上会列出相应的项目列表,点击后面的开关按钮来开启对应项目的 Drone CI 服务

drone ci project list

3.2、创建示例项目

这里的示例项目为 Java 项目,采用 Gradle 构建,项目整体结构如下所示,源码可以从 GitHub 下载

drone test project

将此项目推送到 GitLab 就会触发 Drone CI 自动构建(第一次肯定构建失败,具体看下面配置)

3.3、Drone CLI

这里不得不说一下官方文档真的很烂,有些东西只能自己摸索,而且各种错误提示也是烂的不能再烂,经常遇到 Client Error 404: 这种错误,后面任何提示信息也没有;官方文档中介绍了有些操作只能通过 cli 执行,CLI 下载需要到 GitHub 下载页下载,地址 点这里

cli 工具下载后需要进行配置,目前只支持读取环境变量,使用前需要 export 以下两个变量

  • DRONE_SERVER: Drone CI 地址
  • DRONE_TOKEN: cli 控制 Server 端使用的用户 Token

其中 Token 可以在用户设置页面找到,如下

drone user token

配置好以后就可以使用 cli 操作 CI Server 了

3.4、Drone CI 配置文件

Drone CI 对一个项目进行 CI 构建取决于两个因素,第一必须保证该项目在 Drone 控制面板中开启了构建(构建按钮开启),第二保证项目根目录下存在 .drone.yml;满足这两点后每次提交 Drone 就会根据 .drone.yml 中配置进行按步骤构建;本示例中 .drone.yml 配置如下

1
2
3
4
5
6
7
8
9
10
11
12
13
14
15
16
17
18
19
20
21
22
23
24
25
26
27
28
29
30
31
32
33
34
35
36
37
clone:
git:
image: plugins/git

pipeline:

backend:
image: reg.mritd.me/base/build:2.1.5
commands:
- gradle --no-daemon clean assemble
when:
branch:
event: [ push, pull_request ]
include: [ master ]
exclude: [ develop ]

# rebuild-cache:
# image: drillster/drone-volume-cache
# rebuild: true
# mount:
# - ./build
# volumes:
# - /data/drone/$DRONE_COMMIT_SHA:/cache

docker:
image: mritd/docker-kubectl:v1.8.8
commands:
- bash build_image.sh
volumes:
- /var/run/docker.sock:/var/run/docker.sock


# Pipeline Conditions
branches:
include: [ master, feature/* ]
exclude: [ develop, test/* ]

Drone CI 配置文件为 docker compose 的超集,Drone CI 构建思想是使用不同的阶段定义完成对 CI 流程的整体划分,然后每个阶段内定义不同的任务(task),这些任务所有操作无论是 build、package 等全部由单独的 Docker 镜像完成,同时以 plugins 开头的 image 被解释为内部插件;其他的插件实际上可以看做为标准的 Docker image

第一段 clone 配置声明了源码版本控制系统拉取方式,具体参见 cloning部分,定义后 Drone CI 将自动拉取源码

此后的 pipeline 配置段为定义整个 CI 流程段,该段中可以自定义具体 task,比如后端构建可以取名字为 backend,前端构建可以叫做 frontend;中间可以穿插辅助的如打包 docker 镜像等 task;同 GitLab CI 一样,Agent 在使用 Docker 进行构建时必然涉及到拉取私有镜像,Drone CI 想要拉取私有镜像目前仅能通过 cli 命令行进行设置,而且仅针对项目级设置(全局需要企业版…这也行)

1
drone registry add --repository drone/DroneCI-TestProject --hostname reg.mritd.me --username gitlab --password 123456

在构建时需要注意一点,Drone CI 不同的 task 之间共享源码文件,也就是说如果你在第一个 task 中对源码或者编译后的发布物做了什么更改,在下一个 task 中同样可见,Drone CI 并没有 GitLab CI 在每个 task 中都进行还原的机制

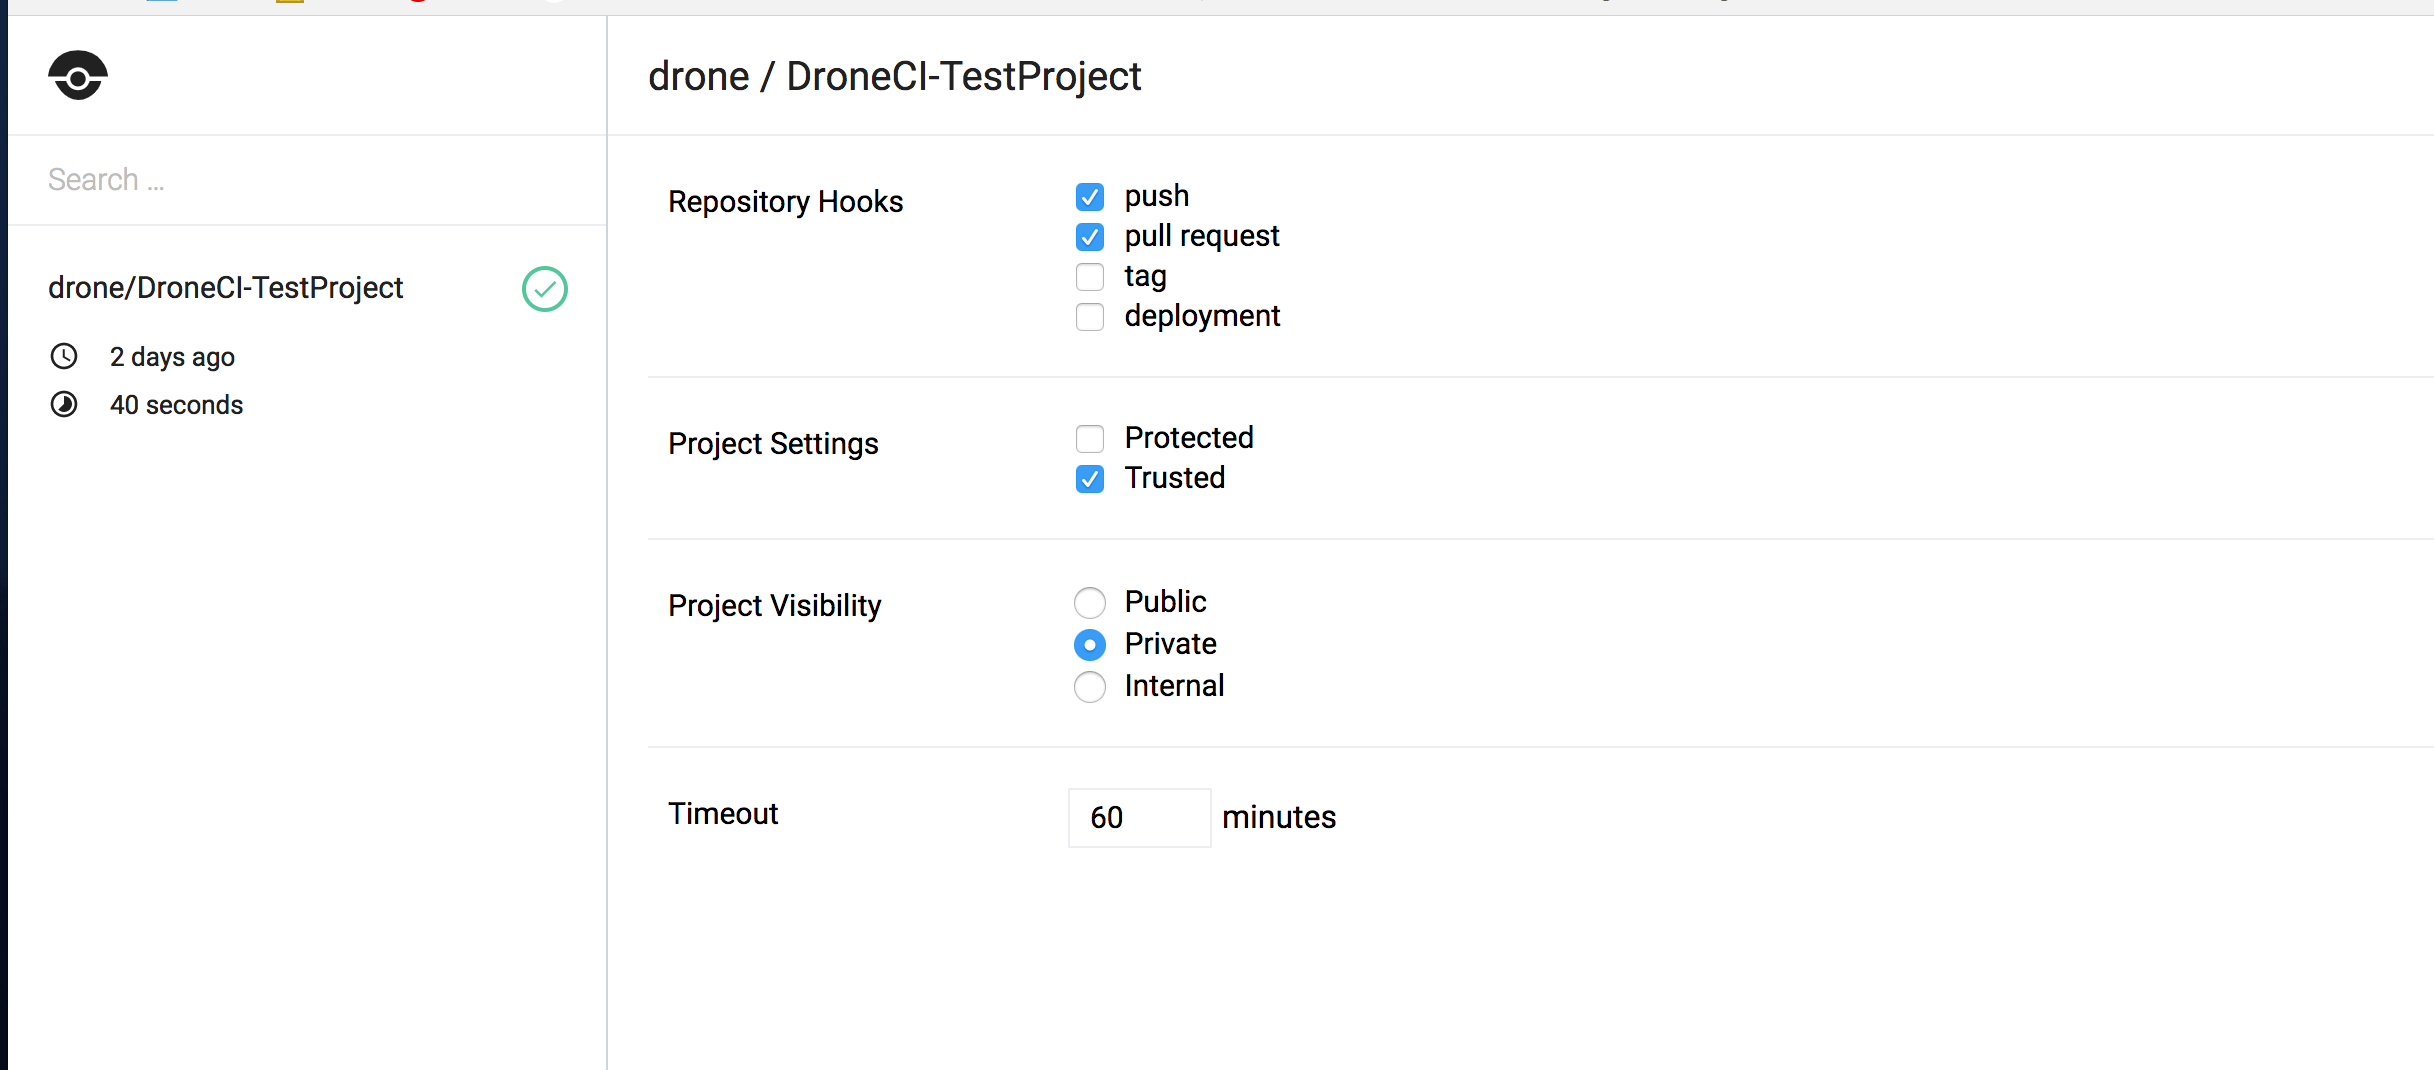
除此之外,某些特殊性的挂载行为默认也是不被允许的,需要在 Drone CI 中对项目做 Trusted 设置

Drone Project Trusted Setting

四、与 GitLab CI 对比

写到这里基本接近尾声了,可能常看我博客的人现在想喷我,这篇文章确实有点水…因为我真不推荐用这玩意,未来发展倒是不确定;下面对比一下与 GitLab CI 的区别

先说一下 Drone CI 的优点,Drone CI 更加轻量级,而且也支持 HA 等设置,配置文件使用 docker compose 的方式对于玩容器多的人确实很爽,启动速度等感觉也比 GitLab CI 要快;而且我个人用 GitLab CI Docker build 的方式时也是尽量将不同功能交给不同的镜像,通过切换镜像实现不同的功能;这个思想在 Drone CI 中表现的非常明显

至于 Drone CI 的缺点,目前我最大的吐槽就是文档烂,报错烂;很多时候搞得莫名其妙,比如上来安装讲的那个管理员账户配置,我现在也没明白怎么能关闭注册启动然后添加用户(可能是我笨);还有就是报错问题,感觉就像写代码不打 log 一样,比如 CI Server 在没有 agent 链接时,如果触发了 build 任务,Drone CI 不会报错,只会在任务上显示一个小闹钟,也没有超时…我傻傻的等了 1 小时;其他的比如全局变量、全局加密参数等都需要企业版才能支持,同时一些细节东西也缺失,比如查看当前 Server 连接的 Agent,对 Agent 打标签实现不同 task 分配等等

总结: Drone CI 目前还是个小玩具阶段,与传统 CI 基本没有抗衡之力,文档功能呢也是缺失比较严重,出问题很难排查


Drone CI 搭建
https://mritd.com/2018/03/30/set-up-drone-ci/
作者
Kovacs
发布于
2018年3月30日
许可协议